Part One – Grooming Your Horse
Darleen Finnigan
This is doing it the hard way! There is no substitute for having a pair of educated eyes helping you understand what your body is doing and how it should be positioned. But … maybe you live too far away from an instructional facility, or just simply can’t afford to pay for lessons just yet. (Are you sure you can afford a horse if this is so?) Following these steps will help prevent you from making as many errors as possible in learning to ride and care for your horse.
First: Approaching the Horse:
Learn how to read the horse’s body language and get his attention any time you are approaching him for any reason (Are his ears pointed toward you?). Approach at the left shoulder and stroke, don’t pat, as that is considered aggressive in horse language. Then move your hand to whatever part of his body you need to work on. Never walk up to a horse and reach for his head area until you really know the horse, and then only when the horse knows you are there!
Second: Start preparing the horse for riding by giving him a complete grooming.
Use a plastic currycomb on muscle areas, never over bony areas. Use this curry in a circular motion to remove dirt, loose hair and old skin. Then follow by brushing entire body, using a softer brush around the face area when the horse trusts you enough to allow this. Use the brush in a quick flicking motion, following the direction of the hair in any given area. Never saddle a horse without grooming because the weight of the saddle presses dirt into the skin where it can rub and eventually cause body sores. Remember to carefully groom under the body where the cinch goes. This area a receives extra pressure when saddled.
Third: Follow the grooming with a check on the feet.
Are his shoes in useable condition? Are the nails holding the shoe on tight? Hold your hoof pick with the handle part coming out of your hand between the thumb and forefinger area and stand facing the rear of the horse. Lift his hoof off the ground by running your hand down the backside of his leg, squeezing gently and picking up his hoof. Hold your hand firmly under the front of the hoof part. Use your hoof pick and pick away from your body, starting at the backside of his hoof, pushing the pick firmly into the buildup of dirt, etc.
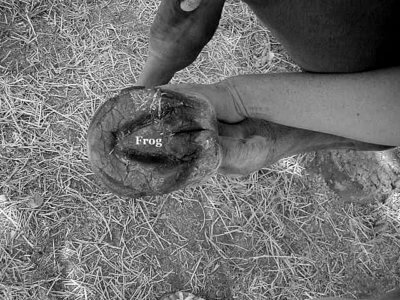 The “frog” is a triangular area illustrated in the photo. Clean well in each groove on the sides of the frog but be careful to not jamb your pick into the frog. This would be painful to the horse. Once you get the frog well clean, so that you can see the white of most of his hoof sole, this would be a good time to spray his feet. This should be done 2 times a week during rainy season, and once or less during dry weather. Use a solution of a 1-4 Clorox/water to prevent thrush from forming in his hoof. (Your horse should always have a dry area, a shed or stall, with dry shavings, available as he desires, to give his feet and body a chance to dry out daily. This will also help prevent thrush and rain-rot on his skin. Both problems are mainly caused from continuously being wet and standing in mud.)
Now your horse is ready to saddle. We will work on learning how to saddle “Western” next month.
Darleen Finnigan, was a CHA & ARIA Certified Instructor
Published in April 2003 Issue
The Northwest Horse Source is an independently owned and operated print and online magazine for horse owners and enthusiasts of all breeds and disciplines in the Pacific Northwest. Our contemporary editorial columns are predominantly written by experts in the region, covering the care, training, keeping and enjoyment of horses, with an eye to the specific concerns in our region.